Are you thinking to move your ecommerce business online?
And worried for how it should be done smoothly?
Well, I know that a common question how to start a shopify store step by step is blinking in everyday thought of business owners.
But creating a Shopify store is not an easy task.
You will need to pay for the space, set up the right storefront, and make sure it looks good.
To get started, you can go through our step-by-step guide to help you build your Shopify ecommerce store.
This guide covers everything from pricing your products, adding images to products, creating collections, setting up your products description!
And the more you walk on Shopify, the more things will come real !
All you need to know is right here !
Creating A Shopify Store
Creating a shopify store is actually a blank spot for most of the beginners who are dreaming to setup a successful shopify ecommerce store.
Because everyone simply watch the videos on youtube and follows all the steps.
But most of those videos doesn’t show the important factors which must be a part of the shopify store.
In this article, I will cover everything from scratch so that you will get step by step guide to setup a successful shopify store without hiring any shopify developer.
Decide A Business Name
Think of your shopify store name as a brand identity.
It is important to name it so that online customers will know what they are getting .
Now the question arises, how to come up with an catchy business name?
Let’s discuss here! Believe me only doing something you want not doing, or not doing something you really want to do.
Start looking around your neighborhood for examples of business names that are already successful. Go online and look at related businesses.
And it will be good if other people who have used the name before shared their experiences with them about how they made money, what involved them in the process of selling their products, about how they learnt to manage their websites.
This will help you come up with a better idea for your own business name.
Here are few ideas which I have used to make my mind at ease over choosing a good online store business name.
- Domain name should not be block by facebook
- Name should include maximum two words
- Last letter of the first word and first letter of the last word should not be same
- Always try for small words
- Brand name should easy to remember
- Brand name should easy to pronounce
- Brand name should not include any copyright related stuff of established brands
- Domain name should have .com extension
- Brand name should not include any bad words (adult or pornography or abusive words)
To get better help for brand name selection, I would suggest to try a free tool from shopify called business name generator.
Sign Up For Shopify
Now open Shopify to sign up for your brand new shopify ecommerce store after having ready your business name.
Signup process is very easy to understand!
First you need create your account along with email, password and security questions.
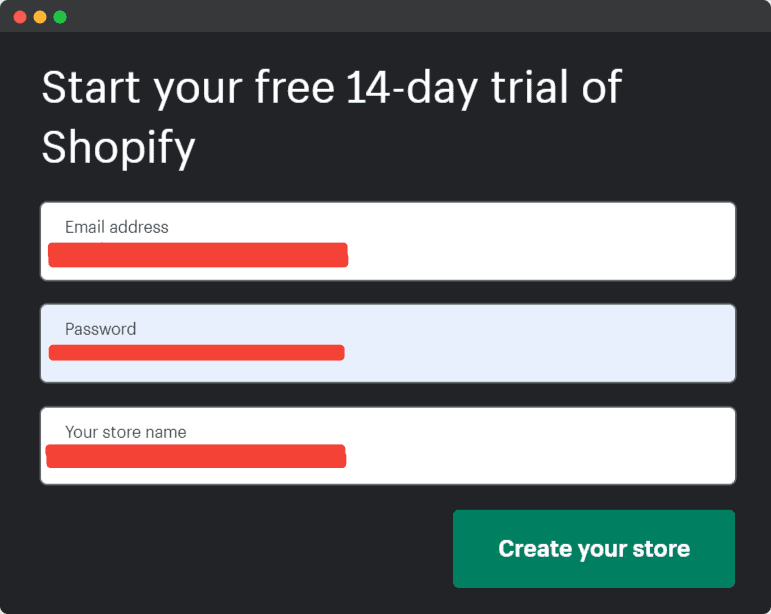
After verifying your details in their system you will get a welcome Message which says “Congratulations, it has been great working with Shopify“.
Voila!! This is how your new shopify store would look like under your control.
Having got your new store set up.
You can now begin building online business, make some collections and start marketing for getting customers through the website content of your shop .
To get technical support, you need to log on to their help center where they will definitely guide you in every aspect of what you need to know about building your own business on Shopify.
Moreover, Shopify offers a free trial for 14-days which you can use to test their services and see how they work for your business.
Click here to get started with Shopify!
Important Settings For Shopify Store
A brand new shopify store must keep the settings in a right way to get the best results with marketing campaigns.
But that is not something which you can easily do.
So before launching into the marketing campaign, I would recommend to go through every step for store settings with all those details as per your requirement and time parameters like “Is it mobile friendly”, How many products will be displayed in homepage view etc.
Once you set the store settings as per your requirement you can see a few changes in site.
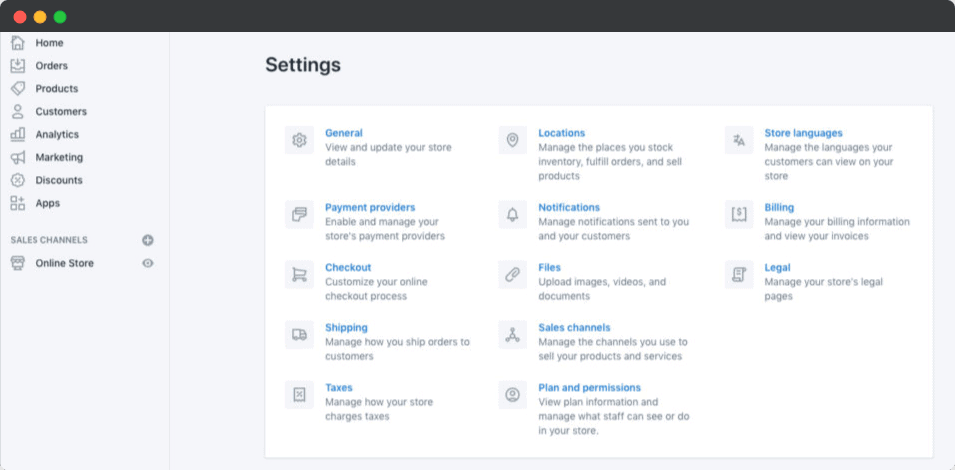
You will now notice that all those buttons which were there before are not showing at homepage view and it is just limited to various product options .
Let’s have a look at the settings below which are most important before launching your brand new shopify store
Set Up Payments For Shopify Store
At the first step, you will need to set up the payments for your shopify store.
Shopify offers extensive instruction on how to setup the payment method which is best suited for stores.
I would recommend to setup the stripe payment gateway first and addition to it, add the paypal as backup.
Having minimum two payment gateways helps a lot to get good conversion rate on checkout step.
To add the payments for your brand new shopify store, just nevigate to settings > payment section and now you should be able to locate the option of adding your payment gateway.
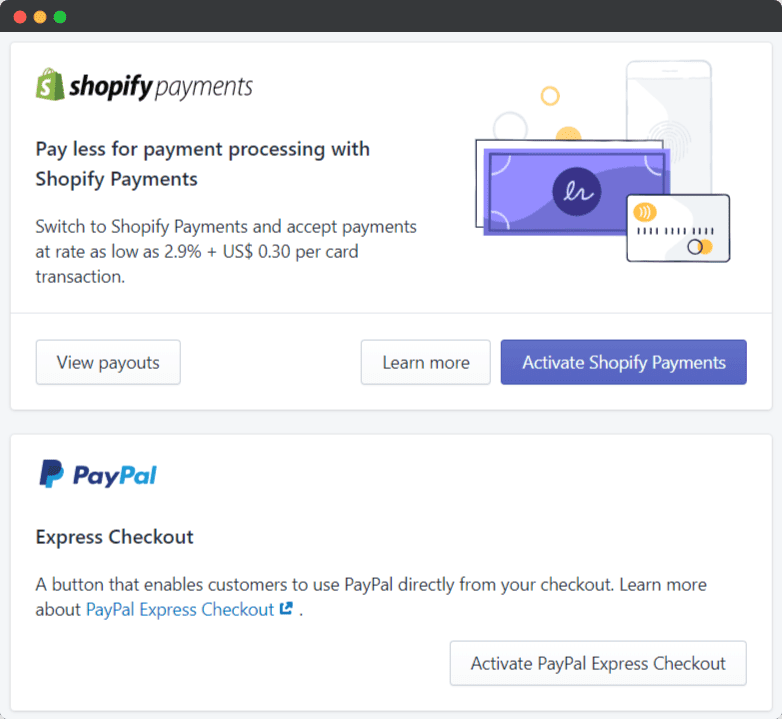
Keep in mind that, shopify support only business accounts for paypal.
Set Up Checkout For Shopify Store
Shopify keep the 100% control over the checkout steps in shopify basic plan and that’s give a common checkout experience to users on all the shopify stores running with basic plan.
But with a few tweaks, we can improve the experience to increase the conversion rate.
To setup the checkout for the brand new shopify store, navigate to the admin section then go directly to “checkout” section and choose a checkout method as per your requirement.
As you can see below, with the ability of setting up an unlimited number of payment gateways by shopify team it becomes very easy for us as ecommerce business owner.
My recommendation is to have at least 2 payment gateways so that it will help to get enough conversions faster.
In USA, most of the people prefer paypal and stripe.
In shopify checkout settings, you can customize the steps such as payment, address and shipping.
In this section, you can also set up the default shipping address and payment method.
The checkout steps are very important as it directly affects the conversion rate of your store.
In case if a user has to login then he might not be able to complete his purchase in that particular moment so it’s very important to consider this point on checkout of your shopify store.
Generate Required Policies
Getting required policies is not an easy job especially if you are just starting the new shopify store from scratch.
Because it needs a lot of important points to mention to protect you from disputes and frauds by fake people.
And I appreciate the shopify because they offer handy tools to generate terms and conditions, privacy policy and return policy for your shopify store.
In this section, you can see the different policies that you need to setup for your shopify store.
To generate required policy on Shopify, navigate to “policies” tab then click “generate policy”.
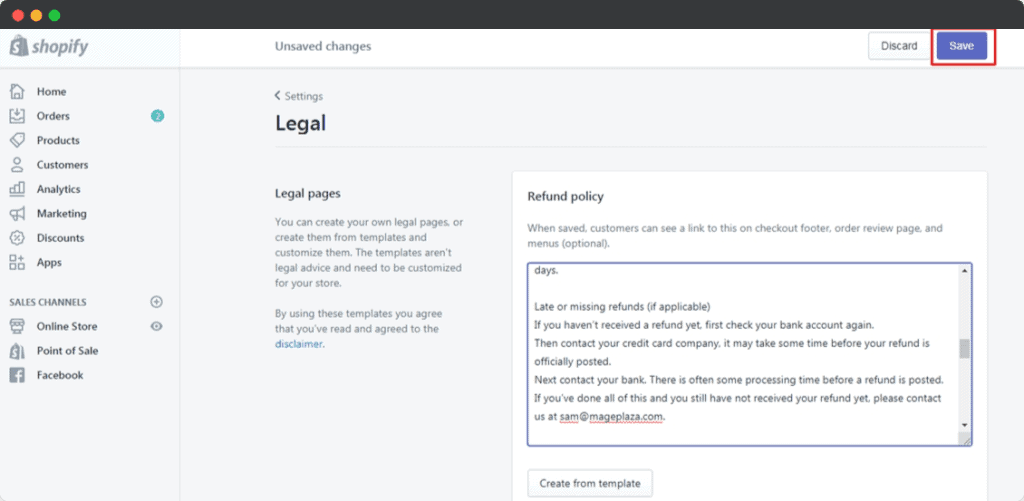
You will be asked few questions and after completing them successfully it will automatically generate the policy for your store.
You can go to “policies” tab and click on “view policies”.
Then you will be able to see all the policies that are generated automatically by shopify team.
It’s a very useful tool when it comes to generating required policies for your shopify store.
If you have any questions regarding to required policy then comment below and I will try my best to answer it as soon as possible.
Add Shipping Details
Shipping details is also an important point for your shopify store.
It’s necessary to mention about the shipping cost and duration of time that it will take for delivery in order to avoid any kind of disputes from customers.
You need to add this information on checkout so that customer can choose their shipping option wisely.
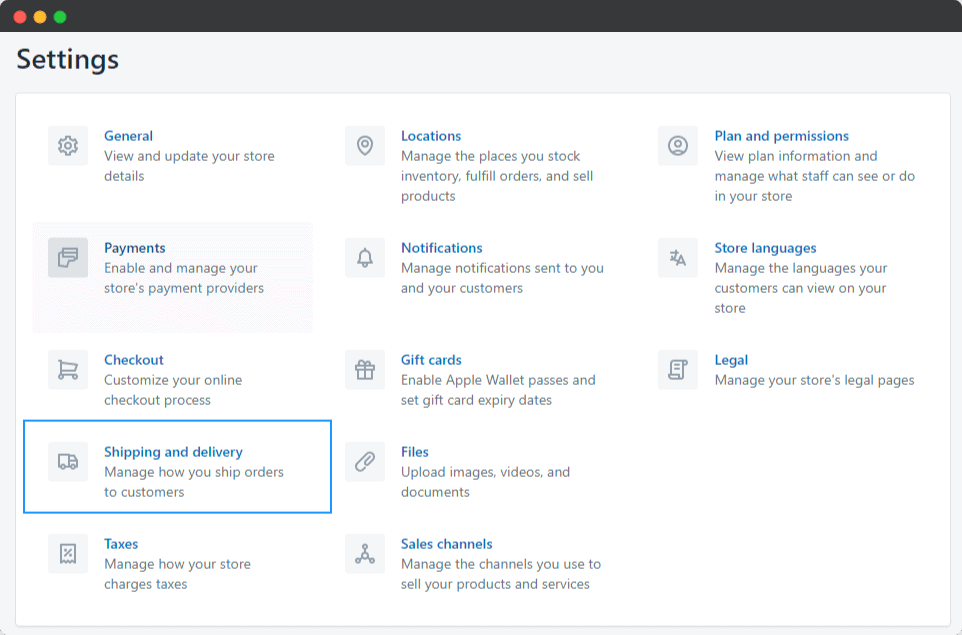
To add the shipping details, navigate to “shipping options” tab then click on “add a new method”.
Then you will be able to see all the available methods that are offered by shopify in order to ship your products. You can choose any method that you want.
After selecting the shipping method, click on “add new option”.
You will be asked few questions and after completing it successfully, your shipping details will be added in order to calculate total cost of delivery for your store.
To check out all the available methods , navigate to “shipping options” tab and click on “view shipping methods”.
After adding the details, you will be able to see all the available shipping method.
You can choose any option that is most suitable for your store.
Personally I prefer to add two shipping rates.
- Free shipping
- Insured shipping with tracking number
Although all the orders will get the tracking number once it will be fulfilled but this strategy works nice.
And for insured shipping, you can easily charge at least $3.95 which is your additional profit from the buyers who will choose this shipping rate.
Set up Taxes
If you are a store owner who is based in the US then you need to set up taxes.
To do so, go to “Taxes” tab and click on “create new tax”.
Then it will ask few questions like how much percent of your total sales should be charged as tax, what is your state and country of business.
After completing all the questions you will be able to see total taxes that should be charged for your store.
If you are going to sell one of the products in your store, then it will automatically add that product on cart and its price with tax.
For example if I am selling a shirt for $20 in my e-commerce site, i have added 5% sales tax rate as shown below.
You can also create different taxes for each state or country that you are selling in.
Once you have added all the details and taxes, click on “save tax” button.
Now your store will be ready to sell in your country or state.
You can also choose which products that should get a specific tax rate by checking it from “tax box”.
You can even create a tax rate for each item separately.
For example, if you are going to sell a shirt in your store and that is not from the list of products on “Taxes” tab then you will have to create a new product with its own price and tax.
Once it has been created, you can add it to your cart and then set the tax rate.
You can also do this for each category or subcategory of products that you are going to sell in your store.
Now when a customer will checkout from your site he/she will see all these taxes on the cart page.
It will also show the total amount of taxes that should be charged for your order.
Once you have all these details ready, it is time to start selling in your store!
Setup Sales Channel For Your Shopify Store
The most common sales channel for a Shopify store is online.
This is because Shopify has an easy-to-use platform that allows anyone to set up and run their own ecommerce business without any prior experience or knowledge of the industry.
However, there are other options that you can choose from.
In order to set up a channel for your Shopify store, go to “Sales Channels” tab and click on the button in the top right corner of this page.
This will take you to an interface where all your sales channels can be found.
You will see a list of all the available sales channels for your store.
If you want to add another one, click on “Add New Channel” button and fill in the details required by Shopify as mentioned above (name, description etc.).
Once you have added a new channel, it will appear on the list of sales channels.
You can also remove any unwanted one by clicking “Remove” button next to its name.
This is important because all your orders should be charged through this particular channel only and not via other ones.
Now that you have set up your sales channel, it is time to start setting up products in the store.
Add Products and Content To Shopify Store
Adding products to Shopify is a simple process. You can add many different types of products, including physical products, digital downloads, or even services.
It’s important to note that you cannot sell anything illegal on Shopify.
To add a product in your store, go to the “Products” tab and click on the button in the top right corner.
This will take you to a page where all your products can be found.
You can also search for a specific product by using its name or SKU code, which is an alphanumeric string that uniquely identifies each product.
Once you have found the product that you want to add, simply click on it and fill in all of its details as mentioned above (name, description etc.).
This will create a new page for your newly added products. The next step is to decide where these products should be displayed on your store.
The most common place to display products is in the “Catalog” tab, which allows you to organize your products by category or alphabetically (by default).
If you want a different way of organizing them, then simply click on the button at the bottom left corner of the page and select “Add to a new category”.
This will open up an additional window where you can name your newly created product.
The next step is to add some information about this product, such as its price, stock level etc., which you can do by clicking on the small “Add Product” button at the top right corner.
This will open up a “Product Info” window where you can add all the information about your product, such as its price and stock level etc.
Once this is done, click on save in order to complete adding this new product to your store.
You can also add products from the “Add Products” page, which is accessible by clicking on the button in the top right corner of any product’s page (it looks like a shopping cart).
This will open up an additional window where you can select different options for the product, such as its name and description.
Once you are done with your changes to this new page, click on save in order to complete adding this new product to your store.
Product Description
Product Description is the text that appears on your store’s product page.
This can be edited from the “Product Info” window, which you access by clicking on the button at top right corner of any product’s page (it looks like a shopping cart).
You will see this window when you click on the button in your store’s navigation bar (for example, at the top of this page).
You can edit this text by simply typing it into here.

Once you are done with editing this new product description, click on save in order to complete adding it to your store.
Remember, product description decides if the visitor will take interest in your product or not so make it crispy, informative and valuable so that your visitors will take immediate action after reading the product description.
Product Images
Images helps visitors to visualize the products/services listed on your shopify store and it plays an important role to increase or decrease the conversion rate.
You can upload images to your store by clicking on the “Add New Image” button in the product’s creation page.
This will open up a new pop-up window where you can select different options for this image, like its name and description.
Once you are done with editing your new image, click on save in order to complete adding this new image to your store.
If you want, you can also add as many images as possible for your products/services and it will increase the conversion rate of visitors because they are able to visualize what exactly is being sold.
Add Variants To The Product If Needed
Adding the variants to the product makes it easy for visitors to select the product with available choices.
From the product creation page itself, you can add the variants of the product like size, color, material or anything.
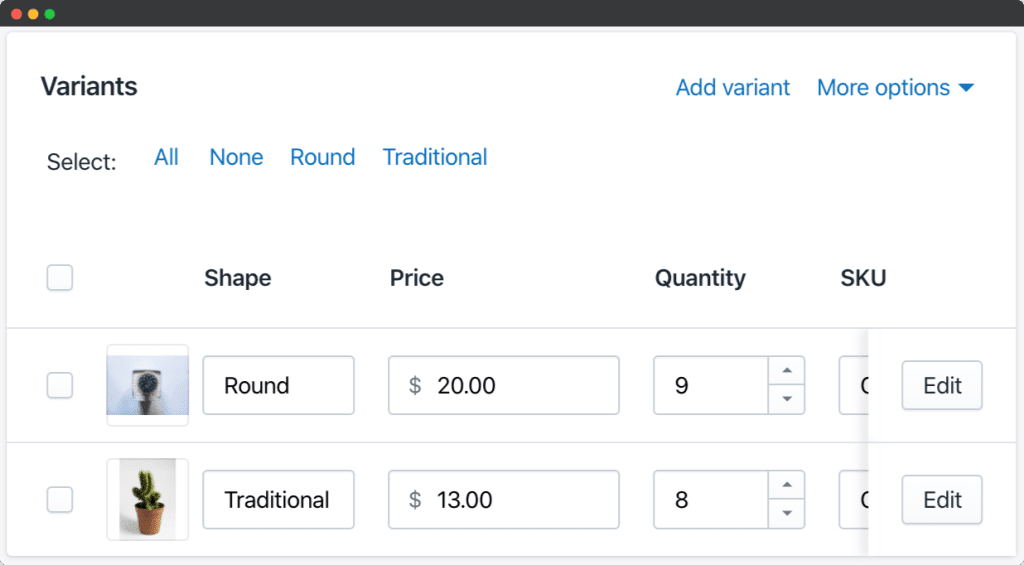
Once you are done with editing the product, click on save in order to complete adding this new variant to your store.
Remember, if you want more than one variant for a particular product then add as many variants as possible so that visitors can select from different options of products offered by your shopify store.
You can also add as many variants for your products/services and it will increase the conversion rate of visitors because they are able to visualize what exactly is being sold.
SEO of Product Pages
Nobody hates the organic traffic from google or other search engine especially when a visitor is coming to your store after searching a buying intent keyword.
This is the main reason why you need to optimize your product pages and make it SEO friendly.
To do this, first of all, you have to create a title for each page with relevant information about the product or service being offered by your shopify store.
This will help in ranking up on search engine results as well as improve customer engagement rate when visitors come across these products/services from their google searches.
You can also add keywords that are related with what exactly is being sold in order to provide more value and encourage people who are visiting your webstore for buying an item or service.
To add more keywords, you need to use the search box provided by Google and type in it relevant words related with your products/services being sold on your webstore.
In addition to this, make sure that all of these product pages are optimized for SEO so that they can rank up well on google searches as well as other search engines like yahoo etc..
This will help increase customer engagement rate when visitors come across a product from their google searches.
About Us
About us page on your store should include all the important details about your business because not everyone but majority of the visitors wants to know about the business and their experience with it.
You can add as many details about your company as possible because people want to know more about you, customers will be interested in buying from you if they read all of this information on “About Us” page.
So make sure that everything you want to tell people about your business is included in the “About Us” page.
Contact Us
If you have a store that deals with any kind of products or services, then it is important to include the “Contact us” page in your shopify store.
This will help visitors to contact you and ask them questions about your product/service because they might be interested in buying from you.
You can also include the “Contact us” page in your store if it is a service provider and people want to know more about that specific business.
The contact form on this particular page will help visitors to send an email regarding their questions and concerns.
You can also use this page to let people know that they are able to contact you via chat if they want because it is important for your business growth.
This will increase the conversion rate of visitors who have a problem with their order, so make sure you are available to answer their questions.
Product Pricing & Inventory
Product pricing is the most crucial job in setup a shopify store because understanding and offering the suitable price will help to convert visitors into customers.
I will cover how to decide and set the price of the products in a seperate article.
To add the price of the products in shopify you need to go the “products” section in your store and then click on “create new product”.
Once you will land to the product creation page inside your dashboard, you should see the the fields-
- Price
- Compare at price
- Cost per item
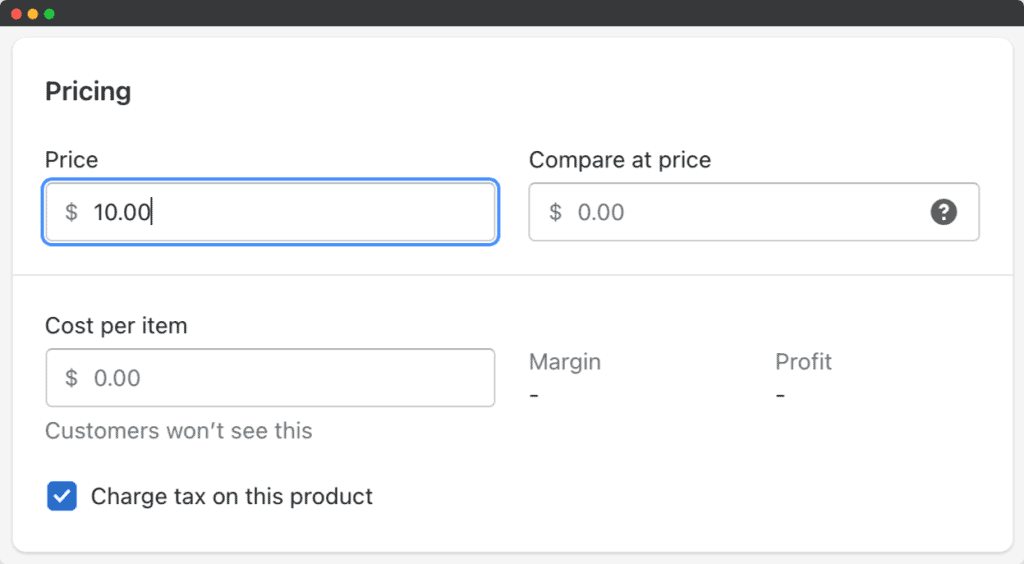
In the field of “Price” put the price you want to sell the product for.
In the field of “Compare at price” put the price you want to show the comparision with the price (it could be 1.5x or 2x of the “Price”)
In the field of “Cost per item” put the price you have to pay to fulfill the product for individual unite.
Cost per item is for your calculations and customers won’t be able to see this anyhow.
After adding the price, you can save it from the button on top right corner of your dashboard screen.
Create Collections
Creating collections in your shopify store is very important in order to help your customers find the right products they want.
In shopify you can create a “collection” by clicking on “products” and then click on the “+” sign.
After adding the products you want to create a collection, click on “create new collection”.
You will see the fields-
Name of Collection: This is just like giving your customers some name and description for them.
You can add as much information about it as possible so that they could find it easily.
Description: This is where you put the details about your collection from how many pieces it contains to what products are in it and so on.
To add the products automatically in the relevant collections, you can set the condition based on tags.
Example-
If product has tag “dog” then the product will update automatically in “dog collection”.
Create The Layout of Shopify Store
This is where you set the layout of your shopify store.
You can choose from different layouts for your store to best suit what you want it to look like and how much space it needs.
To setup the layout, you have to decide first for how you want people to see your shopify store.
There are thousands of tutorial and blog available to show different kind of layout for shopify store.
But here I am mentioning the most important part of layout for your shopify store.
Create the Main Menu/Navigation
Main menu is the first thing on any online store which decides where the visitor will go if he/she wants to explore.
You can choose from the different types of navigation for your shopify store like Home Page, About Us, New Arrivals, Best Sellers, Deal of the day and so on.
To setup the menu/navigation, login to your admin dashboard, then on the left sidebar go to “online store”.
Now you should be able to get the option “Navigation” on the 4th position from online store in left sidebar.
Now click to “Add Menu” button.
This will create a new menu item which is called as Main Menu/Navigation.
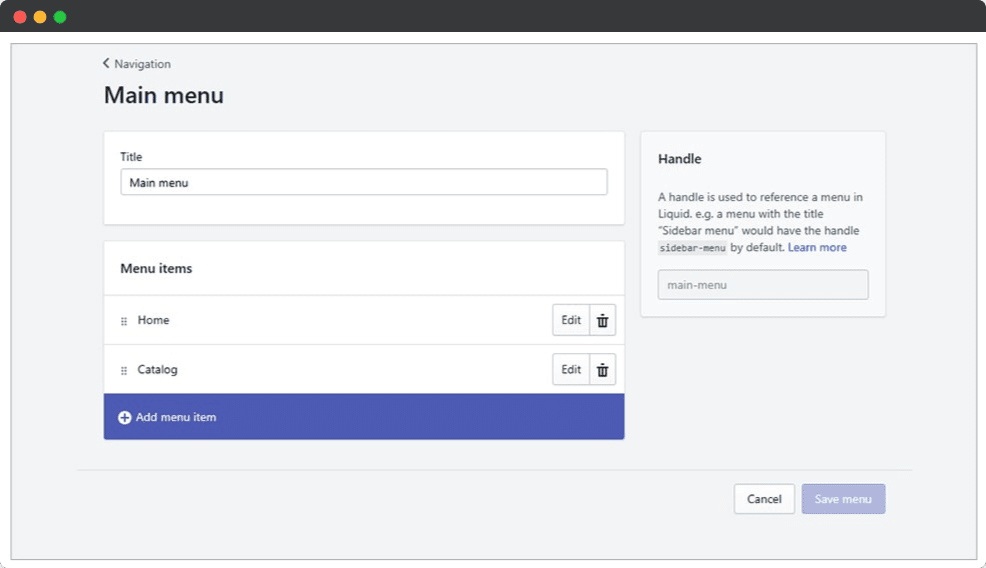
You can add as many main menu items like “About Us”, “New Arrivals”, etc.. for your shopify store as per need and requirement of your business or website.
To get more information about each item, just click on it’s title bar which will open up a new page with details about that particular item such as description, price range, shipping cost and so on…etc..
You can also edit any of the details of the items by clicking on “Edit” button.
Now you will be able to see all your main menu/navigation at once in a single page, which is called as “Online Store”.
Choose Shopify Theme
The shopify theme is the most important part of your layout.
It decides how your online store will look like and what kind of content you are going to put on it.
To choose a theme for your shopify store, login to admin dashboard then go to “online store” option in left sidebar where you can see “Theme”.
You should be able to get two types of themes: Shopify Theme & Custom/Premium Theme.
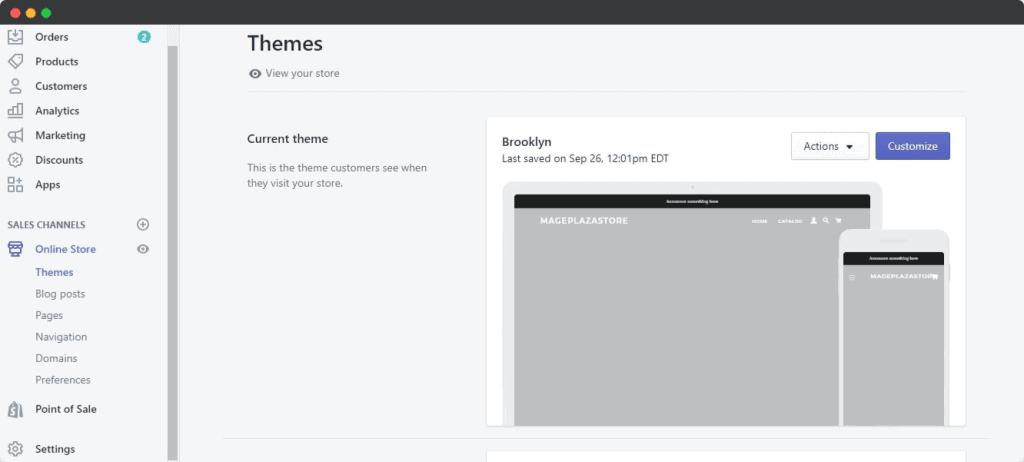
Shopify Themes comes with pre-built layouts which has different variations such as Featured Products, Blog Posting, etc..
You can also create new layouts and add them in your shopify theme.
Custom/Premium Themes on the other hand are completely custom built themes which you can create whatever kind of layout or design you want for your shopify store.
You will be able to find many free themes and premium themes, but it is always better to go with a premium theme as they have more options and features than free theme do.
Free Shopify Themes are also good enough if you just need something simple without too much hassle involved while creating new layouts etc..
To choose a Shopify Theme click “Add New” button at the end of the sidebar.
Now you will be able to see all the Shopify Themes on your online store which are available to use.
After selecting or upload the shopify theme of your choice, press the button “publish” from the actions to apply it on your shopify store.
After publishing this theme, your shopify store will look according to the layout of the theme only.
And you can customize it from the customize option with in the shopify account itself.
Remember, customization options are completely depends on what kind of functionality the theme developer has added inside the theme and it could be different in all shopify themes including free and paid both.
Upload Main Banner
The main banner of your shopify store should be a large image which will attract customer’s attention.
You can upload any kind of banner you want, but it is always better to use an attractive one so that customers are more likely to buy from you.
Before uploading the main banner, make sure that this image has enough space for all the text and other details in it as well.
Because if not then there won’t be enough room left on your shopify store for anything else such as product listing or blog posting etc..
If you don’t have an idea about what type of design you want to use for your main banner then it could be a good idea that you can simply search some shopify themes on the internet and find one that suits your taste.
Once you found the theme of your choice, then simply upload that main banner image to your shopify store.
After uploading this image on your online store press “publish” button from the actions drop down menu and it will be applied on all pages of your shopify website.
And now you can start adding any other images or text to make it look more attractive for customer’s eyes.
You can also add your logo or any other images of your choice to make it look more attractive.
After adding these images, you need to go back and edit the main banner image so that all text in this image is aligned properly with each other.
And now you are ready for adding any product listing inside your shopify store which has discussed already.
Editing Featured Products
Most of the shopify themes has the option to show “Featured Products” on home page.
To edit the featured products, simply edit the featured products collection in your shopify admin.
And it will reflect your modification directly on the featured collection block on your shopify store.
This is the only most easiest way I can suggest for editing the featured products easily.
According to the trend, you should update the featured products on your store to give fresh experience to visitors.
You can also add your own categories and sub-categories to make it more attractive for visitors.
Setting up your Footer
The footer is the last thing that you need to add on your online store.
The footer usually contains text and links which are related to your business or other information such as contact page, social media icons etc.
To set up a footer in Shopify theme, simply go to “footer” section of the theme customization in admin panel and find out the options to customized according to your wish.
Remember, footer must include about, contact, order tracking, privacy policy, refund policy, shipping policy details related to your business.
Not every visitor will check the footer but a few people check everything and every single visitor matter if we want to make them our customer.
At the end of the footer, you should mention the copyright message and secured payment badge.
If you are using free shopify theme, then you may get an unwanted text known as “Powered by Shopify” in the footer and most of the free themes don’t allow to customize this text.
But you can read this article to know how to remove powered by shopify.
Summary: How to Start A Shopify Store in 2025
If you are planning to move your ecommerce business online or just starting a new ecommerce business then shopify is the only platform which has everything you need to do it smoothly.
You don’t need any development skill or need to hire a professional developer with shopify.
In this article, I’ve alredy covered all the basic and important information which can help you to setup shopify store easily.
For checking analytics, either you can check it from the shopify admin or from mobile phone shopify app.
So it has everything which can make you successful in setting up your online store.
Get everything ready and the start 14 days free trial with any of your working email address.
Once everything is ready to go live, you can start your subscription for any shopify plan of your choice.
Frequently Asked Questions
What is Shopify?
Shopify is a software as a service (SaaS) company that helps individuals and businesses create online stores. It offers its users with tools for managing inventory, shipping, payments, marketing and analytics. It is one of the most popular e-commerce platforms in the world with more than 10,00,000 active merchants using it to run their ecommerce business.
Can I set up a Shopify store for free?
Yes, you can setup your shopify store for 100% free of cost for the 14 days trial period from the date you will sign up.
How long would it take to create a Shopify store?
It will take a few hours to create a Shopify store. You can start by creating the website and then adding products in just one day.
How difficult is it to maintain a Shopify store?
There is no technical maintenance needed from your end for shopify store because this is taken care by shopify support. But for customization in theme, design, adding products, updating anything inside store is completely done by you and it could take time based on how big the task is.
How much does it cost to build a Shopify site?
Cost of building a Shopify site varies depending on what you want to do with it. The basic Shopify package starts at $29/month only.
